
We have an insatiable appetite for data these days, and how can we be blamed when our mobile devices give us the possibility of enjoying a large amount of files and applications. If increasing the storage capacity of your Android smartphone has become a priority, you have probably opted for purchasing a memory card that allows you to continue accumulating high resolution photos, full-length videos and amazing apps.
This should be an effective solution, but it is not as simple as it seems. First, you need to confirm that your phone detects the memory card, which in most cases would be done by tapping “Settings”, selecting More and then Storage. Once you have placed the card on your device, you may expect that all the apps that you download from now on, are automatically saved to the SD card. It would be great if things were that easy, but unfortunately it doesn’t happen that way.
Furthermore, moving the existing apps on your device to the SD card may also take a bit of patience and time. That doesn’t mean that it is not possible and by following some steps, you will have the chance of enjoying the advantages of enhancing the storage capacity of your Android phone with an SD card. Here we will tell you how you can pass existing apps from the internal storage of your phone to the SD card and how you can modify the settings to make sure that new apps are saved to the SD card by default.
Application Manager – The simple solution
The Application Manager offers the easiest way to send apps from the device to your SD card. All you need to do to get started, is to go to Settings and look for Application Manager under the More tab. Then you can do the below:
1. In Application Manager, swipe to the left once to access a full list of apps that can be moved to the card.
2. You can select the heaviest apps that are not checked with a green mark (those who are marked are already on the SD card) and once you have identified the most suitable options to forward, simply tap on the Move to SD card button.

This is the most convenient option for moving apps to the SD card and as you can see, it is pretty straightforward. However, it may not work in all cases and you may need to follow additional steps to get things done. Here is what you can try if the app you want to send to the SD card is not appearing in the Application Manager list.
Android’s SDK and Oracle’s JDK
First of all, you will need to enable USB Debugging on the phone. USB debugging is a tool used by developers to establish connection between an Android phone and a computer running the Android Software Development Kit (SDK). Through the USB debugging feature, developers are able to save their creations (Android apps, which have been coded in the Android SDK) to the phone.
First of all, you will need to enable USB Debugging on the phone. USB debugging is a tool used by developers to establish connection between an Android phone and a computer running the Android Software Development Kit (SDK). Through the USB debugging feature, developers are able to save their creations (Android apps, which have been coded in the Android SDK) to the phone.
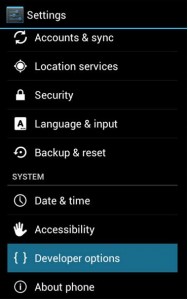
USB debugging will allow you to get access to the phone’s lower level functions and you can find this option in Settings. In the More tab, scroll down and touch About phone. There you will see a selection of options including Device name, Status and Legal Information. Scroll down until you find the Build number and tap it continuously until the Developer mode is open. Go back to the previous screen, tap the Back button, which is located to the right of the Home button, then touch Developer options and select USB debugging. Tap OK on the pop-up that appears with information about USB debugging.
The next part is to get Android’s SDK (free) from developer.android.com, but keep in mind that it is quite big and you may need to wait several minutes for it to be downloaded. Make sure that you get the right version for your computer. To find out if your computer is a 32-bit or a 64-bit, you can press Windows Key + r to open the Run box and then enter the following command: control/name Microsoft System.
You will also need to download the latest version of JDK (free) from Oracle’s official website. Install both SDK’s without changing their default settings. Launch the SDK manager, it will take a few seconds to load and although you will see multiple packages, the main thing is to confirm that the Android SDK Platform-tools option is marked.
The option that allows to send commands to the phone is Android Debug Bridge (ADB). Click the Install Packages button and then Accept License agreements. This will prompt the packages to be downloaded and extracted. You may see a message about Android Tools being updated, but you can click OK and close the window.
Now you can release the power of ADB to get the transfer process started. Locate the folder where SDK Manager.exe is, then click the sdk folder and follow the folder path to get to platform-tools. Press the Shift key, then right click adb.exe and select Open command window here. Connect the phone to the computer using the USB cable, this would bring a pop-up on the phone asking if you wish to allow the computer to execute debugging commands on your phone. Click OK.
To confirm that the ADB recognized your phone, type adb services in the command prompt. Then, enter the following command to configure the default installation of your phone to your SD card: adb shell pm set-install-location 2. You can revert the changes by typing 0 instead of 2 at the end of the command. This will get the phone to use the local device storage instead of saving to the SD card.
The above process should suit most Android users. However, if you own a Samsung Galaxy, you may need to root the phone before you can move your apps to an external storage device. Rooting will give you extended flexibility and a greater control over your Android. In the case of transferring apps from your Galaxy to an SD card, rooting will give you access to the files and applications you want to move and will allow you to change the default storage settings


0 komentar:
Posting Komentar