At Last We Have Discussed About Benefits About Android Application Development And Application Components..
You Can Read It From Here
Now We Are Going To Discuss How To Setup Android Application Development Environment On Our System.
Here is the Step by step instructions to install and configure your Android development environment for Windows.
You Can Read It From Here
Now We Are Going To Discuss How To Setup Android Application Development Environment On Our System.
Here is the Step by step instructions to install and configure your Android development environment for Windows.
Environment/tools: The setup requirements to install Android 4.1 JELLY BEAN includes http://innaz2.blogspot.com /" target="_blank">,
- Windows (I'm using Windows XP, but any flavor of windows you can use)
- Eclipse IDE for Java Developers (v3.7 indigo recommended for Android 4.1installation)
- Java Platform (JDK 6)
- Android SDK Tools http://innaz2.blogspot.com /" target="_blank">, Revision 16
(To add one or more Android platforms for example, Android 2.2 or Android 3.2 to your SDK, use the Android SDK and AVD Manager)
Step1: Download "Eclipse IDE for Java Developers" from here http://www.eclipse.org/downloads/
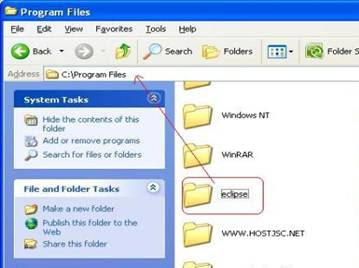
After downloading the Eclipse IDE (I choose v3.7 indigo) unzip the file and Copy the eclipse folder to the program files directory as shown below.
-->
Step 2: Download the Android SDK files from here http://developer.android.com/sdk/index.html
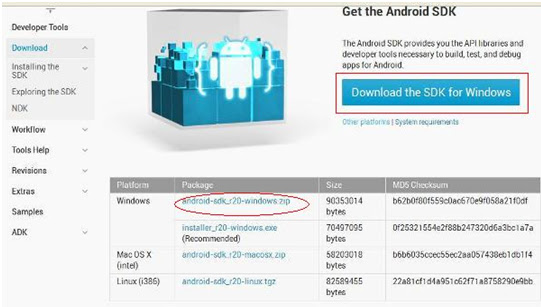
and Select any one of the marked links as shown below if you are using Microsoft Windows OS.
and Select any one of the marked links as shown below if you are using Microsoft Windows OS.
-->
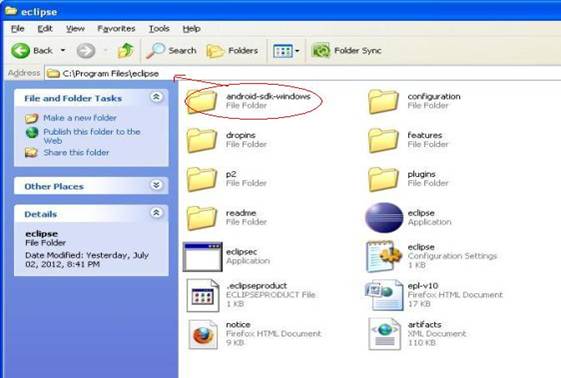
Now, extract the downloaded android SDK zip file and copy the file to Eclipse folder as shown.
-->
Step 3 : Now we have to Configure Android SDK and for that you need to open the SDK manager http://innaz2.blogspot.com /" target="_blank">.
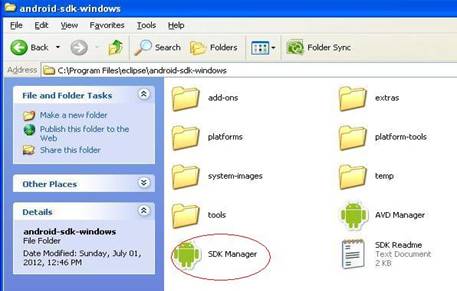
To Open SDK manager Go To android-sdk-windows Folder And Then Double Click On SDK manager.
-->
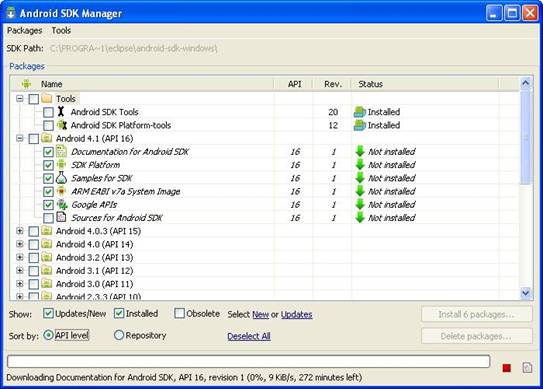
And here goes the Android SDK manager which displays all the packages make sure that you are connected to internet so that you can get to see the available packages to download.
Now Select Mark the following packages As Shown In Figure Below in order to install Android 4.1 JELLY BEANS on windows.
-->
Press the "Install" button and confirm the license for all packages. After the installation completes, restart Eclipse. If you are struggling with slow internet connection Then Download These Packages One After Another Instead Of All At Once http://innaz2.blogspot.com /" target="_blank">.
To Read More On How To Setup A Android Virtual Device Read It From Here


0 komentar:
Posting Komentar